When we started building the Grapes Studio MCP App, the goal was simple: make Studio usable inside tools people already spend time in, like ChatGPT.
We did not want AI to stop at "here is some HTML" or "here is a rough idea." We wanted users to go from prompt, to real project, to visual editing, without breaking their flow or jumping across five tabs. That is where MCP Apps became really interesting for us.
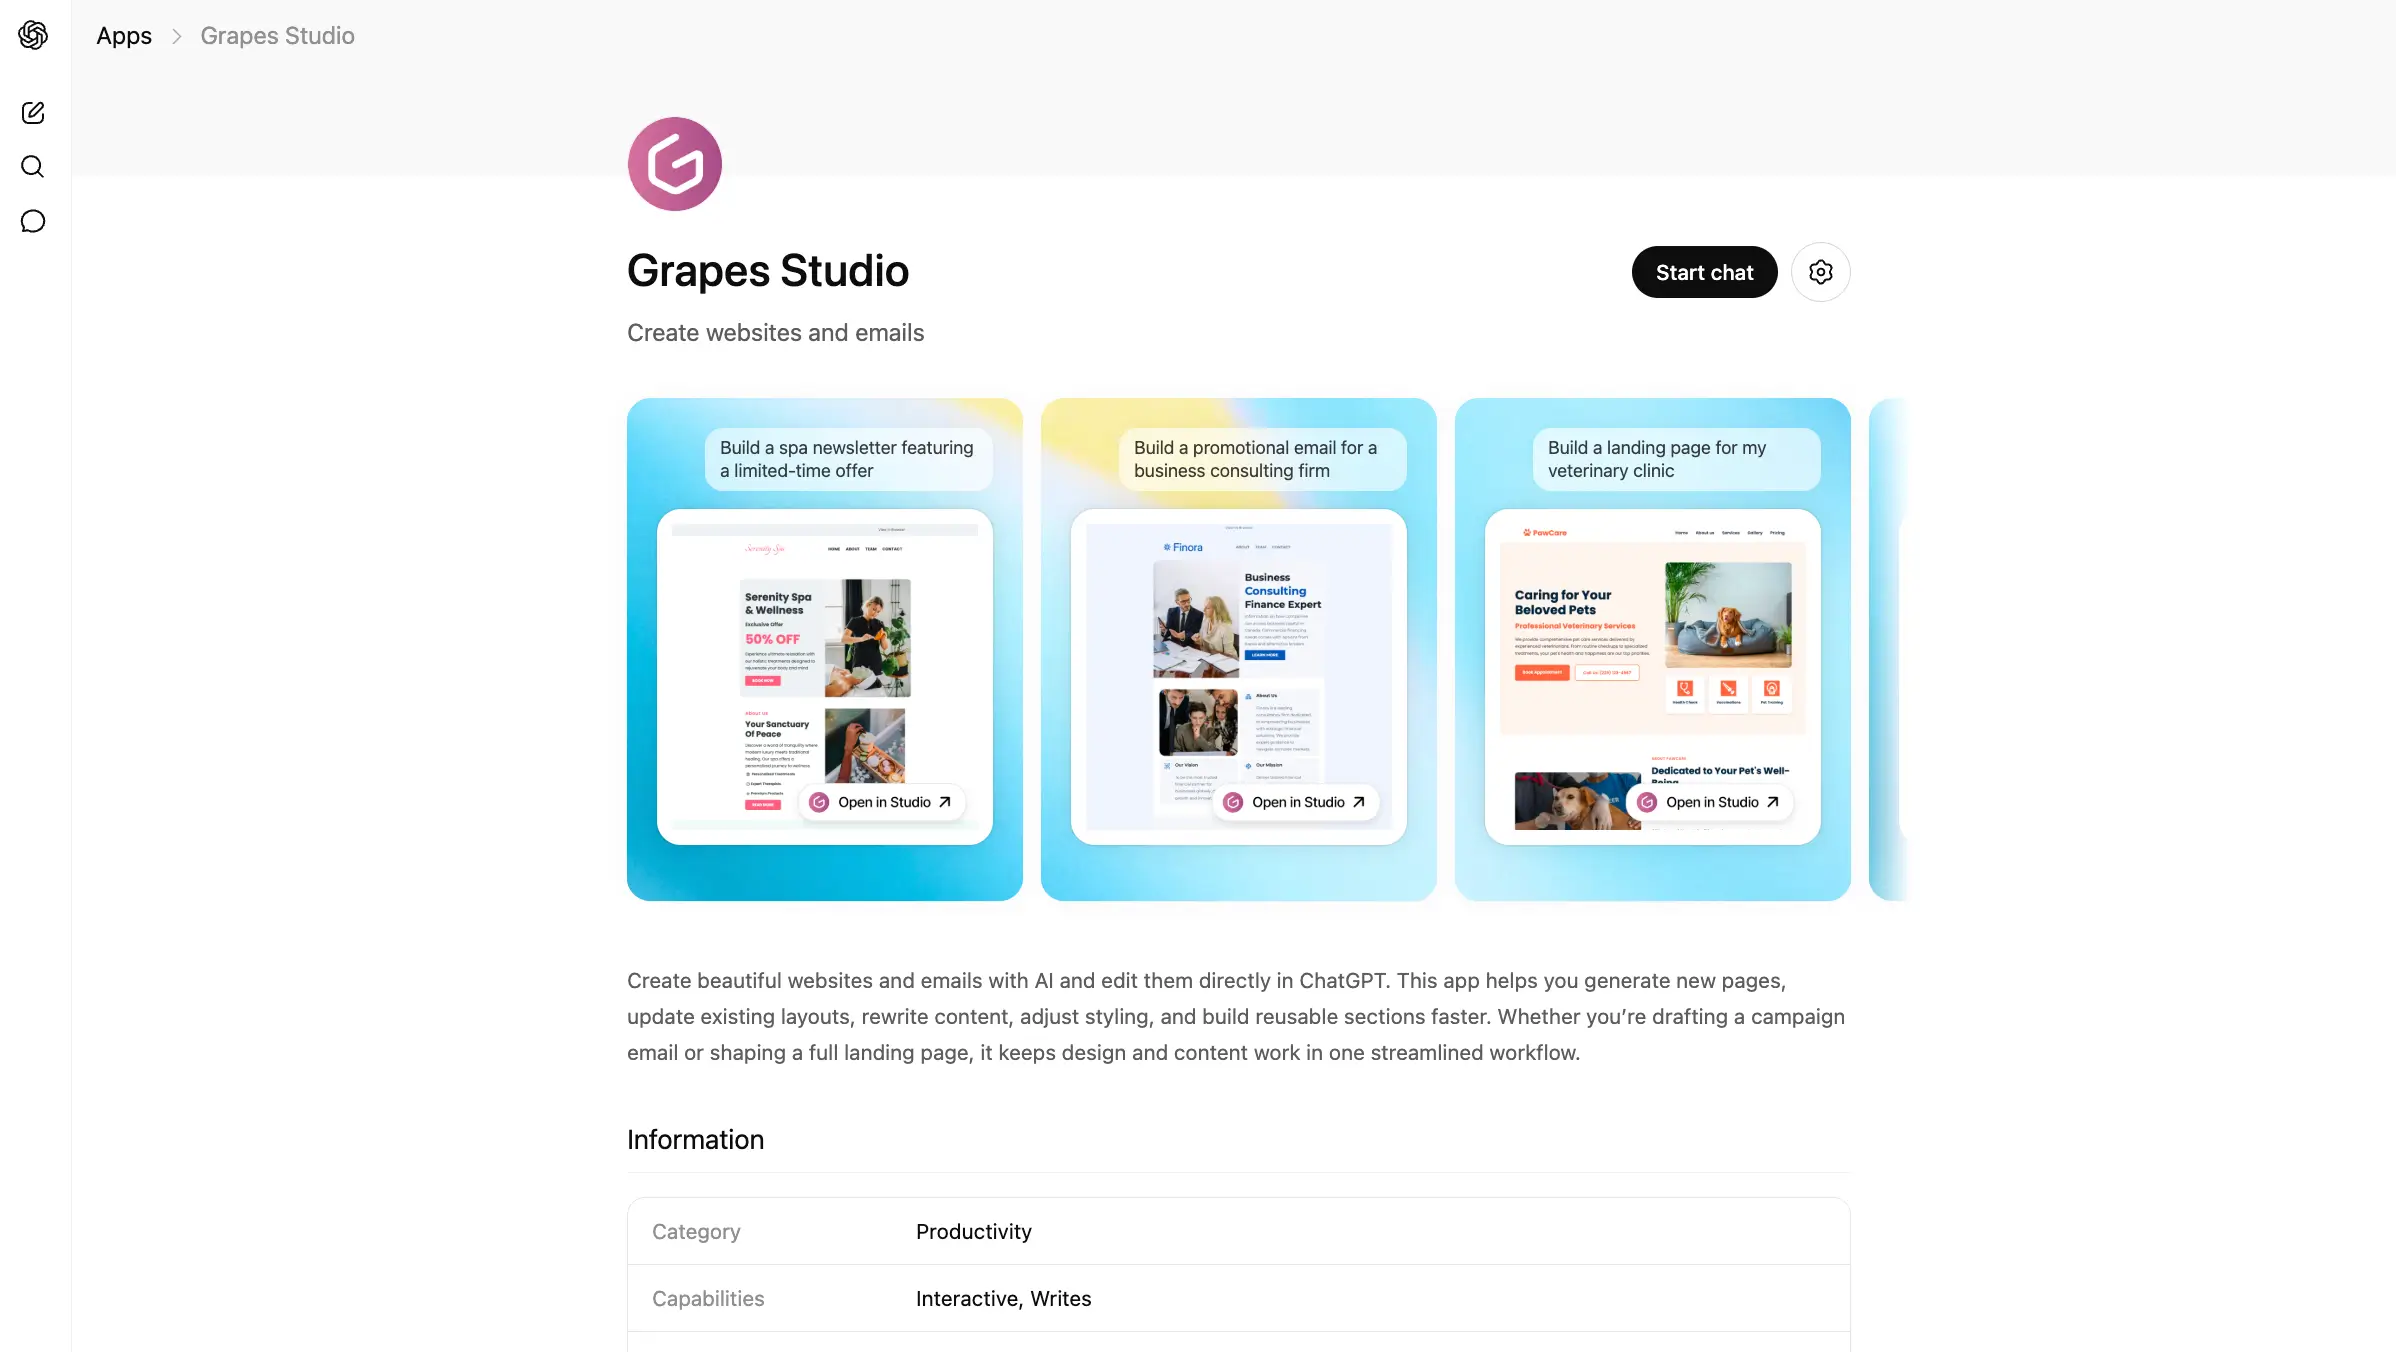
Here is the published app running in ChatGPT:
For developers, though, the path is a bit more nuanced. The core MCP pieces are actually quite reasonable. The hard part is usually the app-host ecosystem around them: review processes, metadata, CSP details, auth setup, iframe loading behavior, and host-specific quirks.
This post shares how we approached it, what stack we used, and a good starting point if you want to build your own MCP server and MCP App from scratch.
Why we built it
Grapes Studio already had the right primitives for this model: structured projects, project files, and visual editing.
What MCP gave us was a clean way to expose those capabilities to AI assistants. Instead of treating ChatGPT as only a text interface, we could let it:
- list projects
- create a new website or email project
- load an existing project
- open a visual editor directly in the chat
- save changes back through MCP tools
That changed the experience from "AI suggests something" to "AI becomes a real entry point into the product."
The stack we used
At a high level, the implementation is split into two pieces:
- An MCP server in our backend.
- A separate MCP App frontend bundle for the interactive UI.
On the server side, the core building blocks are:
@modelcontextprotocol/sdk@modelcontextprotocol/ext-apps
On the UI side, we used:
@modelcontextprotocol/ext-apps- React
- our Studio SDK editor
The exact details of our product are specific to Studio, but the architecture is reusable.
Start with a basic MCP server
If you are starting from scratch, the best path is to first build a plain MCP server that exposes a couple of useful tools without UI.
You do not need to begin with the full app experience. First make sure your transport, auth, and tool model are solid.
Here is the shape from where we started:
import { McpServer } from "@modelcontextprotocol/sdk/server/mcp";
import { z } from "zod";

function createServer() {
  const server = new McpServer({
    name: "acme-campaigns",
    version: "0.1.0",
  });

  server.registerTool(
    "list_projects",
    {
      title: "List projects",
      description: "Return the user's recent projects",
      inputSchema: {
        limit: z.number().int().min(1).max(20).optional(),
      },
    },
    async ({ limit = 10 }) => {
      const projects = await db.project.findMany({
        take: limit,
        orderBy: { updatedAt: "desc" },
      });

      return {
        content: [
          {
            type: "text",
            text: `Found ${projects.length} projects`,
          },
        ],
        structuredContent: {
          projects: projects.map(project => ({
            id: project.id,
            name: project.name,
          })),
        },
      };
    }
  );

  // Register more tools here...

  return server;
}
That was our first real milestone: a small MCP server, a couple of useful tools, and structured results we could trust.
The route layer is usually thinner than you expect
In our implementation, the route itself is intentionally small. It mostly does four things:
- reads auth from the incoming request
- creates the MCP server instance
- attaches a streamable HTTP transport
- returns the transport response
That is the shape we would recommend as a good default for remote MCP servers:
import { WebStandardStreamableHTTPServerTransport } from "@modelcontextprotocol/sdk/server/webStandardStreamableHttp";

export async function handleMcpRequest(request: Request) {
  const authInfo = await getAuthInfoFromRequest(request);
  const server = createServer();
  const transport = new WebStandardStreamableHTTPServerTransport({
    sessionIdGenerator: undefined,
    enableJsonResponse: true,
  });

  try {
    await server.connect(transport);
    return await transport.handleRequest(request, { authInfo });
  } finally {
    await transport.close();
    await server.close();
  }
}
If you are exposing this through Next.js App Router, the route can stay very small:
export async function POST(request: Request) {
  return handleMcpRequest(request);
}
Then add an MCP App resource for UI
Once the server is ready, the next step is attaching an interactive UI resource to the tools that need it.
For us, this was the key move. A visual website and email editor does not fit naturally into pure text output. It needs a real interface.
MCP Apps give you that bridge. The pattern is:
- Register a UI resource.
- Register tools that point to that resource.
- Let the frontend app receive tool results and call back into server tools when needed.
Here is a minimal example of the server side:
import { McpServer } from "@modelcontextprotocol/sdk/server/mcp";
import { registerAppResource, registerAppTool, RESOURCE_MIME_TYPE } from "@modelcontextprotocol/ext-apps/server";
import { z } from "zod";

function htmlPage() {
  return `<!doctype html>
  <html>
    <head>
      <meta charset="utf-8" />
      <meta name="viewport" content="width=device-width, initial-scale=1" />
      <title>Editor</title>
      <link rel="stylesheet" href="https://some-cdn.com/mcp-app/style.css" />
    </head>
    <body>
      <div id="root"></div>
      <script type="module" src="https://some-cdn.com/mcp-app/index.js"></script>
    </body>
  </html>`;
}

const APP_URI = "ui://acme/editor.html";

export function createServer() {
  const server = new McpServer({ name: "acme-campaigns", version: "0.1.0" });

  registerAppResource(
    server,
    "acme-editor",
    APP_URI,
    {
      title: "Acme Editor",
      description: "Interactive editor for campaign projects",
      mimeType: RESOURCE_MIME_TYPE,
    },
    async () => ({
      contents: [
        {
          uri: APP_URI,
          mimeType: RESOURCE_MIME_TYPE,
          text: htmlPage(),
          _meta: {
            "openai/outputTemplate": APP_URI,
            ui: {
              description: "Interactive campaign editor",
              // Provide explicit CSP metadata to help hosts load your app without issues.
              // Adjust these values based on your actual asset hosting.
              csp: {
                connectDomains: ["https://some-cdn.com"],
                resourceDomains: ["https://some-cdn.com"],
              },
            },
          },
        },
      ],
    })
  );

  registerAppTool(
    server,
    "load_project",
    {
      title: "Load project",
      description: "Load a project into the editor UI",
      inputSchema: { projectId: z.string().min(1), },
      _meta: {
        ui: { resourceUri: APP_URI },
        // Host related metadata (eg. ChatGPT)
        "openai/outputTemplate": APP_URI,
        "openai/toolInvocation/invoking": "Loading project...",
        "openai/toolInvocation/invoked": "Project loaded.",
      },
    },
    async ({ projectId }) => {
      const project = await loadProject(projectId);

      return {
        content: [{ type: "text", text: "Project loaded" }],
        structuredContent: {
          project: {
            id: project.id,
            name: project.name,
          },
        },
        _meta: {
          projectData: project.data,
        },
      };
    }
  );

  return server;
}
The important thing here is not the exact metadata names. It is the contract:
- the tool returns the state the UI needs
- the UI resource knows how to boot
- the host can connect the tool result to the app
A simple frontend MCP App
On the frontend, we recommend keeping the first version very small. Connect to the host, read the incoming tool result, render it, and prove that you can call a server tool back from the app.
That can look like this:
import { useApp } from "@modelcontextprotocol/ext-apps/react";
import { useEffect, useState } from "react";

interface Project {
  id: string;
  name: string;
};

export function App() {
  const [project, setProject] = useState<Project | null>(null);
  const [status, setStatus] = useState("Connecting...");

  const { app, isConnected } = useApp({
    appInfo: { name: "acme-campaigns", version: "0.1.0" },
    capabilities: {},
    onAppCreated(app) {
      app.ontoolresult = params => {
        const nextProject = (params.structuredContent as any)?.project;
        if (nextProject) {
          setProject(nextProject);
          setStatus("Ready");
        }
      };
    },
  });

  useEffect(() => {
    if (isConnected && !project) {
      setStatus("Waiting for project context...");
    }
  }, [isConnected, project]);

  async function save() {
    // The standard way to call back to the server is through the app's `callServerTool` method.
    await app.callServerTool({
      name: "save_project",
      arguments: {
        projectId: project.id,
        title: project.name + " updated",
      },
    });
  }

  if (!isConnected || !project) {
    return <p>{status}</p>;
  }

  return (
    <main>
      <h1>{project.name}</h1>
      <button onClick={save}>Save</button>
    </main>
  );
}
For a lot of products, that is enough to get to the first meaningful demo.
Design your tool results for UI from day one
If your tools only return human-readable text, the app layer gets brittle fast. Text output was fine for the chat, but the UI still needed real state and we did not want to keep reconstructing it on the frontend. Stable shapes made that boundary much easier to manage:
structuredContentfor business objects that will be shared with the chat context._metafor heavier UI-only payloads. These won't be shared with the chat.
Once we separated those responsibilities, the flow became much less fragile. The host still got a readable tool result, and the app got the richer payload it actually needed to render and keep going.
A practical hosting detail: serve your app bundle in a host-friendly way
One detail that is easy to underestimate is how your app assets are served.
In our case, the MCP App UI is a separate frontend bundle, but the host still needs a stable HTML resource and a predictable JS/CSS entrypoint. We ended up using a small HTML shell and serving the app bundle through app-controlled routes, which also made CSP and host loading behavior easier to manage.
If you are building from scratch, keep the serving story boring:
- ship a bundled
index.jsandstyle.css - point your resource HTML at those exact files
- make sure your CSP metadata is explicit
That sounds small, but it avoids a surprising amount of pain.
The ChatGPT quirk we had to work around
One host-specific issue we ran into was ChatGPT not always delivering the initial tool result to the app through the normal callback when the UI first loads.
That means your app can render, connect, and still sit there without the payload you expected.
Our workaround was simple: if the initial ontoolresult had not arrived after a short delay, we attempted to hydrate from the host-provided window.openai data instead.
This is the idea in simplified form:
useEffect(() => {
  const openai = window.openai;
  if (!openai || !isConnected || appState) return;

  const timer = setTimeout(() => {
    const fallbackPayload = {
      _meta: { ...openai.toolResponseMetadata },
      structuredContent: { ...openai.toolOutput },
    };

    applyToolResult(fallbackPayload);
  }, 2000);

  return () => clearTimeout(timer);
}, [isConnected, appState]);
In practice, shipping MCP Apps today still means being ready for a few host-specific behaviors like this.
Testing your MCP server and app
There is an official inspector, @modelcontextprotocol/inspector, and it is a useful reference point. In our experience, though, using it was not especially smooth and it felt far from user friendly for day-to-day iteration.
What worked much better for us was MCPJam, an open source alternative that turned out to be exactly what we were looking for. It made the testing experience excellent, both for the MCP server itself and for the UI app around it.
If you are building an MCP integration, we would highly recommend trying it. It shortens the feedback loop a lot and makes the whole process much easier to work with.
The hardest part was not really the code
The hardest part was the review process on app platforms, like ChatGPT. In our case, the full review process took about two weeks. That was manageable, but it was still slower and more manual than the implementation itself.
Looking through posts on OpenAI Community, we also saw other developers describe longer timelines and rejection messages that were not always very clear.
If you are heading into the review phase, prepare for things like:
- long review cycles
- a lot of details and documentation to provide for each tool and user-facing flow
- screen recordings showing the app working as expected
- platform-side issues that are hard to distinguish from your own bugs
- unclear or incomplete rejection reasons
That part is frustrating because it slows down a category of product that should otherwise be very fast to iterate on.
So if you are planning an MCP App launch, build some patience into the schedule. The technical implementation may move faster than the host approval process.
Why we still think it is worth it
Even with the rough edges, we still think MCP Apps are worth the effort.
For a product like Studio, the value becomes obvious the moment someone can create a project, open the editor, and keep iterating without leaving the chat. That is a much better experience than bouncing between a conversation, a generated snippet, and another tab where the real work still has to begin.
That is why the effort was worth it for us. We did not just add another integration surface. We made Grapes Studio available right at the moment when a user wants to stop talking about an idea and actually start building it.